

Our Modules.
Magento Fraud Blocking Module


More Views

- Description
-
Details
Magento Fraud Blocking Module
The purpose of this module is to prevent customers from constantly re-attempting checkout with a different card and repeating this trial and error approach for some number of times. While there are some legitimate use cases where this might happen to honest customers, it is more probable that this individual is attempting to cycle through a stack of stolen cards. It is especially true if during each attempt the customer uses a different billing address.
The Fraud module now has the feature to block your customers password upon sending the confirmation email when a customer registers on your site. To use this feature simply install the module look under Sales > Fraud and select Mask Customer Password.
This module blocks customers from placing orders if they match one of two profiles.
First Profile
If a customer has reached checkout and attempts to pay using a credit card and the card fails, after the specified number of tries set in the config, the customer will be blocked.
Second Profile
The second profile is based off of IP address input into the configuration by an administrator.
In each of these scenarios, the customer will see a dialog box that asks them to call or email customer service to complete their order.
Configuration
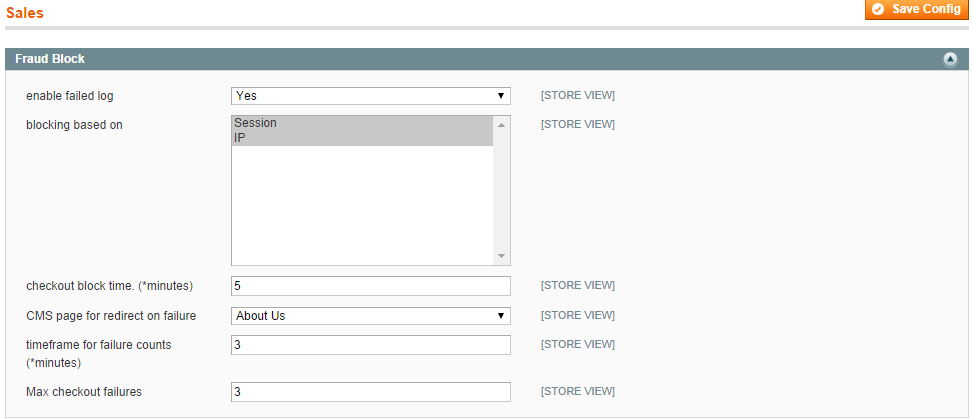
Navigate to System > Configuration > Sales > Sales > Fraud Block.
Identify “enable failed log” option field, single click the drop down arrow on right of field.
*Note - This option should be off on most systems, unless you are troubleshooting an issue.
Identify “blocking based on” multi select field, select preferred option(s). To multi select hold CTRL and click multiple options.
*Note - Both IP and session blocking should be used, however under some circumstances blocking by IP could block out other valid customers behind the same proxy or from the same location.
Identify “checkout block time. (*minutes)” data field. Input preferred time in minutes. This configuration is how long you want to block the offending users from getting into the checkout system.
Identify “CMS page for redirect on failure” option field, single click the drop down arrow on right of field. This is the CMS page we will redirect the user to once the failure count has been reached for the failure time period.
Identify “timeframe for failure counts (*minutes)” data field. This is the timeframe that will be used to count the failures. nce this time is exceeded the failure count for a user is reset.
Identify “Max checkout failures” data field. This is the maximum number of failures the user can have when trying to place an order.
*Note – Whatever number this is set to, on the next attempt to place an order the customer will be redirected to the preferred CMS page for the checkout block time.
Click “Save Config” to save your changes.
Navigate to Sales > Fraud Ban.
Identify “Customer ID” data field, input the preferred customer’s id to ban.
Identify “IP” data field, input the preferred IP to ban.
Identify “Email” data filed, input the preferred email to ban.
Identify “Domain #” data fields, input the preferred domain to ban.
Identify “Browser hash” data field, input the preferred browser hash ban.
Identify “CC hash #” data fields, input the preferred CC hash to ban.
Identify “User is banned?” drop down, right click arrow on left of field, select preferred option.
Identify “Comment” text field, input a comment about why the customer is banned.
Support
Need help? Please contact us at here. Paid installation is available.
- Additional Information
-
Additional Information
- License
- Commercial
- System
- Magento Module
- System Version
- 1.9.x
- Warranty
- No
- Module Type
- Custom Extension
- Installation Instructions
Configuration
- Navigate to System > Configuration > Sales > Sales > Fraud Block.
- Identify “enable failed log” option field, single click the drop down arrow on right of field.
- *Note - This option should be off on most systems, unless you are troubleshooting an issue.
- Identify “blocking based on” multi select field, select preferred option(s). To multi select hold CTRL and click multiple options.
- *Note - Both IP and session blocking should be used, however under some circumstances blocking by IP could block out other valid customers behind the same proxy or from the same location.
- Identify “checkout block time. (*minutes)” data field. Input preferred time in minutes. This configuration is how long you want to block the offending users from getting into the checkout system.
- Identify “CMS page for redirect on failure” option field, single click the drop down arrow on right of field. This is the CMS page we will redirect the user to once the failure count has been reached for the failure time period.
- Identify “timeframe for failure counts (*minutes)” data field. This is the time frame that will be used to count the failures. Once this time is exceeded the failure count for a user is reset.
- Identify “Max checkout failures” data field. This is the maximum number of failures the user can have when trying to place an order.
- *Note - The number this is set to, on the next attempt to place an order the customer will be redirected to the preferred CMS page for the checkout block time.
Click “Save Config” to save your changes.
- Reviews
-
- Installation
-
Configuration
- Navigate to System > Configuration > Sales > Sales > Fraud Block.
- Identify “enable failed log” option field, single click the drop down arrow on right of field.
- *Note - This option should be off on most systems, unless you are troubleshooting an issue.
- Identify “blocking based on” multi select field, select preferred option(s). To multi select hold CTRL and click multiple options.
- *Note - Both IP and session blocking should be used, however under some circumstances blocking by IP could block out other valid customers behind the same proxy or from the same location.
- Identify “checkout block time. (*minutes)” data field. Input preferred time in minutes. This configuration is how long you want to block the offending users from getting into the checkout system.
- Identify “CMS page for redirect on failure” option field, single click the drop down arrow on right of field. This is the CMS page we will redirect the user to once the failure count has been reached for the failure time period.
- Identify “timeframe for failure counts (*minutes)” data field. This is the time frame that will be used to count the failures. Once this time is exceeded the failure count for a user is reset.
- Identify “Max checkout failures” data field. This is the maximum number of failures the user can have when trying to place an order.
- *Note - The number this is set to, on the next attempt to place an order the customer will be redirected to the preferred CMS page for the checkout block time.
Click “Save Config” to save your changes.
Magento Fraud Blocking Module
More Views
- Description
-
Details
Magento Fraud Blocking Module
The purpose of this module is to prevent customers from constantly re-attempting checkout with a different card and repeating this trial and error approach for some number of times. While there are some legitimate use cases where this might happen to honest customers, it is more probable that this individual is attempting to cycle through a stack of stolen cards. It is especially true if during each attempt the customer uses a different billing address.
The Fraud module now has the feature to block your customers password upon sending the confirmation email when a customer registers on your site. To use this feature simply install the module look under Sales > Fraud and select Mask Customer Password.
This module blocks customers from placing orders if they match one of two profiles.
First Profile
If a customer has reached checkout and attempts to pay using a credit card and the card fails, after the specified number of tries set in the config, the customer will be blocked.
Second Profile
The second profile is based off of IP address input into the configuration by an administrator.
In each of these scenarios, the customer will see a dialog box that asks them to call or email customer service to complete their order.
Configuration
Navigate to System > Configuration > Sales > Sales > Fraud Block.
Identify “enable failed log” option field, single click the drop down arrow on right of field.
*Note - This option should be off on most systems, unless you are troubleshooting an issue.
Identify “blocking based on” multi select field, select preferred option(s). To multi select hold CTRL and click multiple options.
*Note - Both IP and session blocking should be used, however under some circumstances blocking by IP could block out other valid customers behind the same proxy or from the same location.
Identify “checkout block time. (*minutes)” data field. Input preferred time in minutes. This configuration is how long you want to block the offending users from getting into the checkout system.
Identify “CMS page for redirect on failure” option field, single click the drop down arrow on right of field. This is the CMS page we will redirect the user to once the failure count has been reached for the failure time period.
Identify “timeframe for failure counts (*minutes)” data field. This is the timeframe that will be used to count the failures. nce this time is exceeded the failure count for a user is reset.
Identify “Max checkout failures” data field. This is the maximum number of failures the user can have when trying to place an order.
*Note – Whatever number this is set to, on the next attempt to place an order the customer will be redirected to the preferred CMS page for the checkout block time.
Click “Save Config” to save your changes.
Navigate to Sales > Fraud Ban.
Identify “Customer ID” data field, input the preferred customer’s id to ban.
Identify “IP” data field, input the preferred IP to ban.
Identify “Email” data filed, input the preferred email to ban.
Identify “Domain #” data fields, input the preferred domain to ban.
Identify “Browser hash” data field, input the preferred browser hash ban.
Identify “CC hash #” data fields, input the preferred CC hash to ban.
Identify “User is banned?” drop down, right click arrow on left of field, select preferred option.
Identify “Comment” text field, input a comment about why the customer is banned.
Support
Need help? Please contact us at here. Paid installation is available.
- Additional Information
-
Additional Information
- License
- Commercial
- System
- Magento Module
- System Version
- 1.9.x
- Warranty
- No
- Module Type
- Custom Extension
- Installation Instructions
Configuration
- Navigate to System > Configuration > Sales > Sales > Fraud Block.
- Identify “enable failed log” option field, single click the drop down arrow on right of field.
- *Note - This option should be off on most systems, unless you are troubleshooting an issue.
- Identify “blocking based on” multi select field, select preferred option(s). To multi select hold CTRL and click multiple options.
- *Note - Both IP and session blocking should be used, however under some circumstances blocking by IP could block out other valid customers behind the same proxy or from the same location.
- Identify “checkout block time. (*minutes)” data field. Input preferred time in minutes. This configuration is how long you want to block the offending users from getting into the checkout system.
- Identify “CMS page for redirect on failure” option field, single click the drop down arrow on right of field. This is the CMS page we will redirect the user to once the failure count has been reached for the failure time period.
- Identify “timeframe for failure counts (*minutes)” data field. This is the time frame that will be used to count the failures. Once this time is exceeded the failure count for a user is reset.
- Identify “Max checkout failures” data field. This is the maximum number of failures the user can have when trying to place an order.
- *Note - The number this is set to, on the next attempt to place an order the customer will be redirected to the preferred CMS page for the checkout block time.
Click “Save Config” to save your changes.
- Reviews
-
- Installation
-
Configuration
- Navigate to System > Configuration > Sales > Sales > Fraud Block.
- Identify “enable failed log” option field, single click the drop down arrow on right of field.
- *Note - This option should be off on most systems, unless you are troubleshooting an issue.
- Identify “blocking based on” multi select field, select preferred option(s). To multi select hold CTRL and click multiple options.
- *Note - Both IP and session blocking should be used, however under some circumstances blocking by IP could block out other valid customers behind the same proxy or from the same location.
- Identify “checkout block time. (*minutes)” data field. Input preferred time in minutes. This configuration is how long you want to block the offending users from getting into the checkout system.
- Identify “CMS page for redirect on failure” option field, single click the drop down arrow on right of field. This is the CMS page we will redirect the user to once the failure count has been reached for the failure time period.
- Identify “timeframe for failure counts (*minutes)” data field. This is the time frame that will be used to count the failures. Once this time is exceeded the failure count for a user is reset.
- Identify “Max checkout failures” data field. This is the maximum number of failures the user can have when trying to place an order.
- *Note - The number this is set to, on the next attempt to place an order the customer will be redirected to the preferred CMS page for the checkout block time.
Click “Save Config” to save your changes.