

Our Modules.
Magento Moneris Credit Card - Hosted Payment Page Vault Payment Module CA (Off Site Processing - Moneris HVARU)
")


More Views


- Description
-
Details
Moneris Hosted Vault Credit Card Processing
Magento Payment Module for Canadian Moneris clients.
This module supports Off-Site processing and generates an API token for the store so the customer can use their card again with it being securely stored on Moneris' server.
Support
Need Help? Please contact us using the contact form. Paid installation is available.
PleaseNote: We do not test nor do we warrant or guarantee our modules for Magento installations running on Windows Server/IIS. Please contact your hosting provider to determine the Web Server and Operating System of your Magento store.
Not sure which module you need?
Try our Moneris module decision manager.
- Additional Information
-
Additional Information
- License
- Commercial
- System
- Magento Module
- System Version
- 1.7.0.x
- Warranty
- 6 Months
- Module Type
- Payment Module
- Installation Instructions
Before installing / updating or anything else
You should always backup your Magento Database & Magento Installation files. For more instructions on how to backup your installation please refer to these instructions. Please read all instructions before you start so you understand all the caveats of installing this module.
To Upgrade
If you have a previous version of this module installed you will just need to follow the installation instructions and replace all the files.
Unzipping and Uploading
After you have downloaded the Moneris Credit Card module for your store, please use a tool like Winrar, WinZip or similar to unzip the contents of the ZIP file you downloaded. Now check the extracted files, you should an "app" and "lib" folder. Then you are ready to upload your files. Open your favorite FTP/SFTP/SCP client and connect to the server with your Magento installation. Navigate to the root folder of the Magento installation, in other words the folder that contains folders like "app", "skin", "js", "lib" and more. Then, upload the extracted folders directly into the root of your Magento installation. Your FTP client will not overwrite any files, it will only upload the new files that come with the software.
Setup a Moneris Dev Account
Moneris Hosted Vault config / Installation
https://esqa.moneris.com/mpg/index.php
Creating a Hosted Vault Configuration
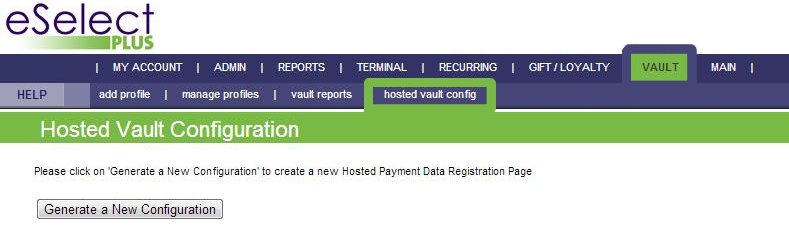
Once you have successfully logged in, click on Vault in the menu bar and then in the submenu that appears. Click on Hosted Vault Config. In the production environment, an individual must be granted permission to access and alter the configuration. User permissions may be updated by navigating to Admin and then selecting Modify User from the submenu. Once you have found the user to be updated, click on Set Permissions and update their Administrative Permissions. Each eSELECTplus account may have up to five unique Hosted Vault configurations. Each configuration can have a differing appearance as well as handle responses in varying ways. Because the eSELECTplus test environment is a shared environment there is no limit to the number of configurations assigned to a specific store account. However there is a 30 day time limit where a store configuration will be deleted after 30 days, regardless of use. Please do not alter or delete configurations that were not assigned to you. To create a new Hosted Vault configuration click on Generate a New Configuration. You will be assigned a Hosted Vault ID (res_id) this is the identifier for this unique configuration. You will also be assigned a Hosted Vault Token (res_key). The Hosted Vault ID and Token are sent as part of the registration/update request to securely identify your store and the specific configuration.
Configuring the Hosted Vault Page
Generate new res_key: This allows you to change the Hosted Vault Token (res_key). Both the res_id and res_key are to be kept secure, though if security were to be compromised, you may generate a new res_key without having to create a completely new configuration.
Basic Configuration
Response Method: This determines how the transaction response will be handled.
Sent to your server as a POST: eSELECTplus will use an HTTP POST to send the transaction responsesto your web server so that you can store the data_key and proceed with other processes which may be associated with account creation or updates.
Sent to your server as a GET: eSELECTplus will redirect the cardholder to a URL on your server and attach the response as a URL encoded query string at the end of the URL so that you can store the data_key and proceed with other processes which may be associated with account creation or updates. Please note that there are limitations imposed by the browser and operating system on the length of a query string.
Note: When handling the response (POST or GET), you must be able to dynamically parse the data. In the future, new variables may be added and the order of the response variables may change.
Response URL: You will need to specify the URL where the transaction response will be returned (either in a POST or GET). The URL needs to be complete www.example.com is not sufficient a proper URL is http://www.example.com/response.php (IP addresses are not supported). If a URL is missing or improperly typed it may result in a 404 error or a looping page.
Note: Click on the Save Changes button to save the existing configuration. If the configuration is not saved the current Hosted Vault ID (res_id) and Token (res_key) will be deleted after a period of time.
Hosted Vault Page Appearance
Click on the Configure Appearance button to specify what will be displayed on the Hosted Paypage. Hex Color Chart: All colors in the Colors and Styles section must be inputted as the standard HTML hex color value. You may click this button to view a color chart.
Colors and Styles
Background color: This defines the background color of the page.
Font style: This defines what font group will be used for the HVARU. We have defined three groups Arial/Helvetica/SansSerif, Times New Roman/Times/Serif and Courier New/Courier/Mono.
Primary text color: This defines the color of text on the HVARU. This must be legible on the chosen background color.
Merchant name color: This defines the color that will be used for your company's business/merchant name.
Header & footer highlight color: The HVARU will contain a header and footer and a color bar is used to define these sections. This defines the color of the header and footer bars.
Section divider color: The HVARU may be divided into several sections depending on what is displayed. A color bar is used to define the information. This defines the color of the section divider bars.
Section divider text color: Occasionally the Section Divider Bar will contain text this defines the color of the text that will appear in the Section Divider Bar. Please ensure that the text is legible (i.e. Do not pick the same color for the Section Divider Color and for the Section Divider Text Color).
Subsection divider color: The HVARU may be divided into several sub-sections depending on what is displayed. A color heading highlight is used to define the information. This defines the color of the sub-section headings.
Subsection divider text color: Occasionally the sub-section headings will contain text this defines the color of the text that will appear in the Subsection Divider. Please ensure that the text is legible (i.e. Do not pick the same color for the Subsection Divider Color and for the Subsection Divider Text Color).
Hosted Vault Page Data Fields
Display customer details. (cust_id, email, note, phone . . .): This field indicates whether the Customer ID (cust_id) is to be displayed on the HVARU the Customer ID field is often used for membership #s, policy #s, student IDs, or invoice #s. It is a searchable field from the Merchant Resource Centre. Also, this field will indicate whether the HVARU should display other fields such as the customers email address (email), the phone number (phone) and the note field the note field can contain any special instructions. In order to display this information it is required that the cust_id, email, phone and note fields be sent in the transaction request. Please see request variables to properly send this data. Display merchant name: This field indicates whether the Merchant Name should also be displayed on the HVARU. The name that will be displayed is the official Merchant Name that Moneris Solutions has associated with the account and the name that the cardholder will see on their credit card statement. It is mandated by industry regulations that the merchant name be displayed on any checkout pages and receipts, but this field may be omitted if the HVARU will be loaded within a frame that already displays the merchant name. If you choose to load the HVARU within a frame, you are then required to have an SSL certificate.
Hosted Vault Page Input Fields
Display AVS input: This defines whether the HVARU should include the prompt for the Address Verification Service (AVS) details. If these input fields are displayed on the Hosted Paypage it is then mandatory that the cardholder complete this data.
Logos:
This section defines what logos will appear on the hosted vault page. Please note that credit card logos are for display only and will not affect what card types you are able to accept. To begin accepting a new card type, please contact the Service Centre at 1-866-319-7450.
Credit Card Logos:Allows you to select which logos should appear on the hosted vault page. Check off theappropriate logos; Visa, MasterCard, American Express, Diners, Discover, Sears.
Note: Click on the Save Appearance Settings button to apply these appearance settings to the Hosted Vault configuration. If the appearance configuration is not saved these fields will be returned to their last known saved configuration.Next, click on the Return to main configuration button to continue with your Hosted Vault configuration setup.
Security Features
Click on Configure Security to add extra security measures to the HVARU.
Referring URL: By adding a URL, you specify that you would like us to check whether the transaction is coming from a location (URL) that you allow. Only POSTs sent from one of the specified URLs will be processed. (It is possible for the Referring URL to be spoofed this is not a guaranteed method of securing your transactions but it makes it more difficult).
Add URL: Here you can specify up to ten Referring URLs to a max of 255 characters. Each URL needs to be complete and at a registered domain www.example.com is not sufficient the proper URL is http://www.example.com/index.html (IP addresses are not supported). After specifying a URL, click on the Add URL button to add it to the Allowed URLs list. Once a URL has been added, the Remove URL button will become available.
Note: To verify your Referring URL, you may POST to https://esqa.moneris.com/HPPDP/myurl.php which will display the URL you are posting from.
Transaction Verification
Enable Transaction Verification: This must be checked for transaction verification to be enabled. When Transaction Verification is enabled the HVARU will return a transactionKey in the transaction response. When the response is received the fields should be logged and a transaction verification request is sent to eSELECTplus. eSELECTplus then replies with transaction information and whether the transaction was valid or not. Each transaction can only be verified once and it must be verified within 15 minutes of the original transaction being performed. This allows you to ensure that the responses sent to your page are not spoofed and that you are only receiving the responses once. If you also intend to check the Referring URL you must ensure that the source of the verification request is in the list of Allowed URLs.
Response Method: This determines how the transaction verification response will be handled.
Displayed as XML on our server: Once the transaction verification has been performed the HVARU will generate a page and display an XML string. This can be used in conjunction with URL, screen scraping or other such methods.
Displayed as key/value pairs on our server: Once the transaction verification has been performed the HVARU will generate a page and display key value pairs. This can be used in conjunction with URL, screen scraping or other such methods.
Note: When handling the response, you must be able to dynamically parse the data. In the future, new variables may be added and the order of the response variables may change.
Note: Click on the Save Verification Settings button to apply these chosen additional security features to the Hosted Vault configuration. If the security feature is not saved these fields will be returned to their last known saved configuration.
Vault Update Settings:This section will allow you to have the update information page locked for a specified number of minutes after a set number of sequential failed key attempts have been made. An email can also be sent when the page is locked.
Number of attempts:This is the number of sequential failed attempts that the HVARU will allow before locking and preventing all future attempts for the number of minutes defined under Lock Period. For example, to lock the update functionality for 15 minutes after it has received 4 invalid data keys sequentially, please set the Number of Attempts to 4 and the Lock Period to 15.
Lock Period:This defines the number of minutes the update functionality will be locked. To lock the update functionality indefinitely set Lock Period to '999'.
Email Address: If the HVARU is locked, a notification email will be sent to this address if it is filled in. To receive an email after every invalid data key but to never lock the update feature, configure Number of Attempts to '1' and Lock Period to '0', and fill in Email Address.
Note: Click on the Save Vault Update Settings button to apply these chosen additional security features to the Hosted Vault configuration. If the security feature is not saved these fields will be returned to their last known saved configuration. Next, click on the Return to main configuration button to continue with your Hosted Vault.
Configuration
After you have uploaded the files, you need to login to your Magento administration panel and refresh your cache by going to System > Cache management. Select Select All and click Refresh, so the cache gets updated. Then, go to your System > Configuration page and select Payment Methods. Verify that you have a new option called Moneris Credit Cards in the Payment Methods page. If you can see it there, Moneris Credit Cards has been installed correctly. The module has optional Postal Code AVS validation.The AVS is postal code match only. you will have to select the options you would like to decline cards for. if you enable this and the postal code is not a match; it will still allow the transaction however it will notify you that it did not match. You will need to look through the Moneris PDF and decide which AVS codes you would like to decline for. You will need the developers handbook and a good understanding of how Moneris processes AVS to configure this option and use it for fraud protection. You can also customize failed / decline messages in the admin section. If you turn on (*Magento) system logging in the developer configuration and enable the test mode for the module it will print all the details for debugging purpose. Test mode also enables the development servers as Moneris uses different servers for production and development.
- Reviews
-
- Installation
-
Before installing / updating or anything else
You should always backup your Magento Database & Magento Installation files. For more instructions on how to backup your installation please refer to these instructions. Please read all instructions before you start so you understand all the caveats of installing this module.
To Upgrade
If you have a previous version of this module installed you will just need to follow the installation instructions and replace all the files.
Unzipping and Uploading
After you have downloaded the Moneris Credit Card module for your store, please use a tool like Winrar, WinZip or similar to unzip the contents of the ZIP file you downloaded. Now check the extracted files, you should an "app" and "lib" folder. Then you are ready to upload your files. Open your favorite FTP/SFTP/SCP client and connect to the server with your Magento installation. Navigate to the root folder of the Magento installation, in other words the folder that contains folders like "app", "skin", "js", "lib" and more. Then, upload the extracted folders directly into the root of your Magento installation. Your FTP client will not overwrite any files, it will only upload the new files that come with the software.
Setup a Moneris Dev Account
Moneris Hosted Vault config / Installation
https://esqa.moneris.com/mpg/index.php
Creating a Hosted Vault Configuration
Once you have successfully logged in, click on Vault in the menu bar and then in the submenu that appears. Click on Hosted Vault Config. In the production environment, an individual must be granted permission to access and alter the configuration. User permissions may be updated by navigating to Admin and then selecting Modify User from the submenu. Once you have found the user to be updated, click on Set Permissions and update their Administrative Permissions. Each eSELECTplus account may have up to five unique Hosted Vault configurations. Each configuration can have a differing appearance as well as handle responses in varying ways. Because the eSELECTplus test environment is a shared environment there is no limit to the number of configurations assigned to a specific store account. However there is a 30 day time limit where a store configuration will be deleted after 30 days, regardless of use. Please do not alter or delete configurations that were not assigned to you. To create a new Hosted Vault configuration click on Generate a New Configuration. You will be assigned a Hosted Vault ID (res_id) this is the identifier for this unique configuration. You will also be assigned a Hosted Vault Token (res_key). The Hosted Vault ID and Token are sent as part of the registration/update request to securely identify your store and the specific configuration.
Configuring the Hosted Vault Page
Generate new res_key: This allows you to change the Hosted Vault Token (res_key). Both the res_id and res_key are to be kept secure, though if security were to be compromised, you may generate a new res_key without having to create a completely new configuration.
Basic Configuration
Response Method: This determines how the transaction response will be handled.
Sent to your server as a POST: eSELECTplus will use an HTTP POST to send the transaction responsesto your web server so that you can store the data_key and proceed with other processes which may be associated with account creation or updates.
Sent to your server as a GET: eSELECTplus will redirect the cardholder to a URL on your server and attach the response as a URL encoded query string at the end of the URL so that you can store the data_key and proceed with other processes which may be associated with account creation or updates. Please note that there are limitations imposed by the browser and operating system on the length of a query string.
Note: When handling the response (POST or GET), you must be able to dynamically parse the data. In the future, new variables may be added and the order of the response variables may change.
Response URL: You will need to specify the URL where the transaction response will be returned (either in a POST or GET). The URL needs to be complete www.example.com is not sufficient a proper URL is http://www.example.com/response.php (IP addresses are not supported). If a URL is missing or improperly typed it may result in a 404 error or a looping page.
Note: Click on the Save Changes button to save the existing configuration. If the configuration is not saved the current Hosted Vault ID (res_id) and Token (res_key) will be deleted after a period of time.
Hosted Vault Page Appearance
Click on the Configure Appearance button to specify what will be displayed on the Hosted Paypage. Hex Color Chart: All colors in the Colors and Styles section must be inputted as the standard HTML hex color value. You may click this button to view a color chart.
Colors and Styles
Background color: This defines the background color of the page.
Font style: This defines what font group will be used for the HVARU. We have defined three groups Arial/Helvetica/SansSerif, Times New Roman/Times/Serif and Courier New/Courier/Mono.
Primary text color: This defines the color of text on the HVARU. This must be legible on the chosen background color.
Merchant name color: This defines the color that will be used for your company's business/merchant name.
Header & footer highlight color: The HVARU will contain a header and footer and a color bar is used to define these sections. This defines the color of the header and footer bars.
Section divider color: The HVARU may be divided into several sections depending on what is displayed. A color bar is used to define the information. This defines the color of the section divider bars.
Section divider text color: Occasionally the Section Divider Bar will contain text this defines the color of the text that will appear in the Section Divider Bar. Please ensure that the text is legible (i.e. Do not pick the same color for the Section Divider Color and for the Section Divider Text Color).
Subsection divider color: The HVARU may be divided into several sub-sections depending on what is displayed. A color heading highlight is used to define the information. This defines the color of the sub-section headings.
Subsection divider text color: Occasionally the sub-section headings will contain text this defines the color of the text that will appear in the Subsection Divider. Please ensure that the text is legible (i.e. Do not pick the same color for the Subsection Divider Color and for the Subsection Divider Text Color).
Hosted Vault Page Data Fields
Display customer details. (cust_id, email, note, phone . . .): This field indicates whether the Customer ID (cust_id) is to be displayed on the HVARU the Customer ID field is often used for membership #s, policy #s, student IDs, or invoice #s. It is a searchable field from the Merchant Resource Centre. Also, this field will indicate whether the HVARU should display other fields such as the customers email address (email), the phone number (phone) and the note field the note field can contain any special instructions. In order to display this information it is required that the cust_id, email, phone and note fields be sent in the transaction request. Please see request variables to properly send this data. Display merchant name: This field indicates whether the Merchant Name should also be displayed on the HVARU. The name that will be displayed is the official Merchant Name that Moneris Solutions has associated with the account and the name that the cardholder will see on their credit card statement. It is mandated by industry regulations that the merchant name be displayed on any checkout pages and receipts, but this field may be omitted if the HVARU will be loaded within a frame that already displays the merchant name. If you choose to load the HVARU within a frame, you are then required to have an SSL certificate.
Hosted Vault Page Input Fields
Display AVS input: This defines whether the HVARU should include the prompt for the Address Verification Service (AVS) details. If these input fields are displayed on the Hosted Paypage it is then mandatory that the cardholder complete this data.
Logos:
This section defines what logos will appear on the hosted vault page. Please note that credit card logos are for display only and will not affect what card types you are able to accept. To begin accepting a new card type, please contact the Service Centre at 1-866-319-7450.
Credit Card Logos:Allows you to select which logos should appear on the hosted vault page. Check off theappropriate logos; Visa, MasterCard, American Express, Diners, Discover, Sears.
Note: Click on the Save Appearance Settings button to apply these appearance settings to the Hosted Vault configuration. If the appearance configuration is not saved these fields will be returned to their last known saved configuration.Next, click on the Return to main configuration button to continue with your Hosted Vault configuration setup.
Security Features
Click on Configure Security to add extra security measures to the HVARU.
Referring URL: By adding a URL, you specify that you would like us to check whether the transaction is coming from a location (URL) that you allow. Only POSTs sent from one of the specified URLs will be processed. (It is possible for the Referring URL to be spoofed this is not a guaranteed method of securing your transactions but it makes it more difficult).
Add URL: Here you can specify up to ten Referring URLs to a max of 255 characters. Each URL needs to be complete and at a registered domain www.example.com is not sufficient the proper URL is http://www.example.com/index.html (IP addresses are not supported). After specifying a URL, click on the Add URL button to add it to the Allowed URLs list. Once a URL has been added, the Remove URL button will become available.
Note: To verify your Referring URL, you may POST to https://esqa.moneris.com/HPPDP/myurl.php which will display the URL you are posting from.
Transaction Verification
Enable Transaction Verification: This must be checked for transaction verification to be enabled. When Transaction Verification is enabled the HVARU will return a transactionKey in the transaction response. When the response is received the fields should be logged and a transaction verification request is sent to eSELECTplus. eSELECTplus then replies with transaction information and whether the transaction was valid or not. Each transaction can only be verified once and it must be verified within 15 minutes of the original transaction being performed. This allows you to ensure that the responses sent to your page are not spoofed and that you are only receiving the responses once. If you also intend to check the Referring URL you must ensure that the source of the verification request is in the list of Allowed URLs.
Response Method: This determines how the transaction verification response will be handled.
Displayed as XML on our server: Once the transaction verification has been performed the HVARU will generate a page and display an XML string. This can be used in conjunction with URL, screen scraping or other such methods.
Displayed as key/value pairs on our server: Once the transaction verification has been performed the HVARU will generate a page and display key value pairs. This can be used in conjunction with URL, screen scraping or other such methods.
Note: When handling the response, you must be able to dynamically parse the data. In the future, new variables may be added and the order of the response variables may change.
Note: Click on the Save Verification Settings button to apply these chosen additional security features to the Hosted Vault configuration. If the security feature is not saved these fields will be returned to their last known saved configuration.
Vault Update Settings:This section will allow you to have the update information page locked for a specified number of minutes after a set number of sequential failed key attempts have been made. An email can also be sent when the page is locked.
Number of attempts:This is the number of sequential failed attempts that the HVARU will allow before locking and preventing all future attempts for the number of minutes defined under Lock Period. For example, to lock the update functionality for 15 minutes after it has received 4 invalid data keys sequentially, please set the Number of Attempts to 4 and the Lock Period to 15.
Lock Period:This defines the number of minutes the update functionality will be locked. To lock the update functionality indefinitely set Lock Period to '999'.
Email Address: If the HVARU is locked, a notification email will be sent to this address if it is filled in. To receive an email after every invalid data key but to never lock the update feature, configure Number of Attempts to '1' and Lock Period to '0', and fill in Email Address.
Note: Click on the Save Vault Update Settings button to apply these chosen additional security features to the Hosted Vault configuration. If the security feature is not saved these fields will be returned to their last known saved configuration. Next, click on the Return to main configuration button to continue with your Hosted Vault.
Configuration
After you have uploaded the files, you need to login to your Magento administration panel and refresh your cache by going to System > Cache management. Select Select All and click Refresh, so the cache gets updated. Then, go to your System > Configuration page and select Payment Methods. Verify that you have a new option called Moneris Credit Cards in the Payment Methods page. If you can see it there, Moneris Credit Cards has been installed correctly. The module has optional Postal Code AVS validation.The AVS is postal code match only. you will have to select the options you would like to decline cards for. if you enable this and the postal code is not a match; it will still allow the transaction however it will notify you that it did not match. You will need to look through the Moneris PDF and decide which AVS codes you would like to decline for. You will need the developers handbook and a good understanding of how Moneris processes AVS to configure this option and use it for fraud protection. You can also customize failed / decline messages in the admin section. If you turn on (*Magento) system logging in the developer configuration and enable the test mode for the module it will print all the details for debugging purpose. Test mode also enables the development servers as Moneris uses different servers for production and development.
Magento Moneris Credit Card - Hosted Payment Page Vault Payment Module CA (Off Site Processing - Moneris HVARU)
More Views
- Description
-
Details
Moneris Hosted Vault Credit Card Processing
Magento Payment Module for Canadian Moneris clients.
This module supports Off-Site processing and generates an API token for the store so the customer can use their card again with it being securely stored on Moneris' server.
Support
Need Help? Please contact us using the contact form. Paid installation is available.
PleaseNote: We do not test nor do we warrant or guarantee our modules for Magento installations running on Windows Server/IIS. Please contact your hosting provider to determine the Web Server and Operating System of your Magento store.
Not sure which module you need?
Try our Moneris module decision manager.
- Additional Information
-
Additional Information
- License
- Commercial
- System
- Magento Module
- System Version
- 1.7.0.x
- Warranty
- 6 Months
- Module Type
- Payment Module
- Installation Instructions
Before installing / updating or anything else
You should always backup your Magento Database & Magento Installation files. For more instructions on how to backup your installation please refer to these instructions. Please read all instructions before you start so you understand all the caveats of installing this module.
To Upgrade
If you have a previous version of this module installed you will just need to follow the installation instructions and replace all the files.
Unzipping and Uploading
After you have downloaded the Moneris Credit Card module for your store, please use a tool like Winrar, WinZip or similar to unzip the contents of the ZIP file you downloaded. Now check the extracted files, you should an "app" and "lib" folder. Then you are ready to upload your files. Open your favorite FTP/SFTP/SCP client and connect to the server with your Magento installation. Navigate to the root folder of the Magento installation, in other words the folder that contains folders like "app", "skin", "js", "lib" and more. Then, upload the extracted folders directly into the root of your Magento installation. Your FTP client will not overwrite any files, it will only upload the new files that come with the software.
Setup a Moneris Dev Account
Moneris Hosted Vault config / Installation
https://esqa.moneris.com/mpg/index.php
Creating a Hosted Vault Configuration
Once you have successfully logged in, click on Vault in the menu bar and then in the submenu that appears. Click on Hosted Vault Config. In the production environment, an individual must be granted permission to access and alter the configuration. User permissions may be updated by navigating to Admin and then selecting Modify User from the submenu. Once you have found the user to be updated, click on Set Permissions and update their Administrative Permissions. Each eSELECTplus account may have up to five unique Hosted Vault configurations. Each configuration can have a differing appearance as well as handle responses in varying ways. Because the eSELECTplus test environment is a shared environment there is no limit to the number of configurations assigned to a specific store account. However there is a 30 day time limit where a store configuration will be deleted after 30 days, regardless of use. Please do not alter or delete configurations that were not assigned to you. To create a new Hosted Vault configuration click on Generate a New Configuration. You will be assigned a Hosted Vault ID (res_id) this is the identifier for this unique configuration. You will also be assigned a Hosted Vault Token (res_key). The Hosted Vault ID and Token are sent as part of the registration/update request to securely identify your store and the specific configuration.
Configuring the Hosted Vault Page
Generate new res_key: This allows you to change the Hosted Vault Token (res_key). Both the res_id and res_key are to be kept secure, though if security were to be compromised, you may generate a new res_key without having to create a completely new configuration.
Basic Configuration
Response Method: This determines how the transaction response will be handled.
Sent to your server as a POST: eSELECTplus will use an HTTP POST to send the transaction responsesto your web server so that you can store the data_key and proceed with other processes which may be associated with account creation or updates.
Sent to your server as a GET: eSELECTplus will redirect the cardholder to a URL on your server and attach the response as a URL encoded query string at the end of the URL so that you can store the data_key and proceed with other processes which may be associated with account creation or updates. Please note that there are limitations imposed by the browser and operating system on the length of a query string.
Note: When handling the response (POST or GET), you must be able to dynamically parse the data. In the future, new variables may be added and the order of the response variables may change.
Response URL: You will need to specify the URL where the transaction response will be returned (either in a POST or GET). The URL needs to be complete www.example.com is not sufficient a proper URL is http://www.example.com/response.php (IP addresses are not supported). If a URL is missing or improperly typed it may result in a 404 error or a looping page.
Note: Click on the Save Changes button to save the existing configuration. If the configuration is not saved the current Hosted Vault ID (res_id) and Token (res_key) will be deleted after a period of time.
Hosted Vault Page Appearance
Click on the Configure Appearance button to specify what will be displayed on the Hosted Paypage. Hex Color Chart: All colors in the Colors and Styles section must be inputted as the standard HTML hex color value. You may click this button to view a color chart.
Colors and Styles
Background color: This defines the background color of the page.
Font style: This defines what font group will be used for the HVARU. We have defined three groups Arial/Helvetica/SansSerif, Times New Roman/Times/Serif and Courier New/Courier/Mono.
Primary text color: This defines the color of text on the HVARU. This must be legible on the chosen background color.
Merchant name color: This defines the color that will be used for your company's business/merchant name.
Header & footer highlight color: The HVARU will contain a header and footer and a color bar is used to define these sections. This defines the color of the header and footer bars.
Section divider color: The HVARU may be divided into several sections depending on what is displayed. A color bar is used to define the information. This defines the color of the section divider bars.
Section divider text color: Occasionally the Section Divider Bar will contain text this defines the color of the text that will appear in the Section Divider Bar. Please ensure that the text is legible (i.e. Do not pick the same color for the Section Divider Color and for the Section Divider Text Color).
Subsection divider color: The HVARU may be divided into several sub-sections depending on what is displayed. A color heading highlight is used to define the information. This defines the color of the sub-section headings.
Subsection divider text color: Occasionally the sub-section headings will contain text this defines the color of the text that will appear in the Subsection Divider. Please ensure that the text is legible (i.e. Do not pick the same color for the Subsection Divider Color and for the Subsection Divider Text Color).
Hosted Vault Page Data Fields
Display customer details. (cust_id, email, note, phone . . .): This field indicates whether the Customer ID (cust_id) is to be displayed on the HVARU the Customer ID field is often used for membership #s, policy #s, student IDs, or invoice #s. It is a searchable field from the Merchant Resource Centre. Also, this field will indicate whether the HVARU should display other fields such as the customers email address (email), the phone number (phone) and the note field the note field can contain any special instructions. In order to display this information it is required that the cust_id, email, phone and note fields be sent in the transaction request. Please see request variables to properly send this data. Display merchant name: This field indicates whether the Merchant Name should also be displayed on the HVARU. The name that will be displayed is the official Merchant Name that Moneris Solutions has associated with the account and the name that the cardholder will see on their credit card statement. It is mandated by industry regulations that the merchant name be displayed on any checkout pages and receipts, but this field may be omitted if the HVARU will be loaded within a frame that already displays the merchant name. If you choose to load the HVARU within a frame, you are then required to have an SSL certificate.
Hosted Vault Page Input Fields
Display AVS input: This defines whether the HVARU should include the prompt for the Address Verification Service (AVS) details. If these input fields are displayed on the Hosted Paypage it is then mandatory that the cardholder complete this data.
Logos:
This section defines what logos will appear on the hosted vault page. Please note that credit card logos are for display only and will not affect what card types you are able to accept. To begin accepting a new card type, please contact the Service Centre at 1-866-319-7450.
Credit Card Logos:Allows you to select which logos should appear on the hosted vault page. Check off theappropriate logos; Visa, MasterCard, American Express, Diners, Discover, Sears.
Note: Click on the Save Appearance Settings button to apply these appearance settings to the Hosted Vault configuration. If the appearance configuration is not saved these fields will be returned to their last known saved configuration.Next, click on the Return to main configuration button to continue with your Hosted Vault configuration setup.
Security Features
Click on Configure Security to add extra security measures to the HVARU.
Referring URL: By adding a URL, you specify that you would like us to check whether the transaction is coming from a location (URL) that you allow. Only POSTs sent from one of the specified URLs will be processed. (It is possible for the Referring URL to be spoofed this is not a guaranteed method of securing your transactions but it makes it more difficult).
Add URL: Here you can specify up to ten Referring URLs to a max of 255 characters. Each URL needs to be complete and at a registered domain www.example.com is not sufficient the proper URL is http://www.example.com/index.html (IP addresses are not supported). After specifying a URL, click on the Add URL button to add it to the Allowed URLs list. Once a URL has been added, the Remove URL button will become available.
Note: To verify your Referring URL, you may POST to https://esqa.moneris.com/HPPDP/myurl.php which will display the URL you are posting from.
Transaction Verification
Enable Transaction Verification: This must be checked for transaction verification to be enabled. When Transaction Verification is enabled the HVARU will return a transactionKey in the transaction response. When the response is received the fields should be logged and a transaction verification request is sent to eSELECTplus. eSELECTplus then replies with transaction information and whether the transaction was valid or not. Each transaction can only be verified once and it must be verified within 15 minutes of the original transaction being performed. This allows you to ensure that the responses sent to your page are not spoofed and that you are only receiving the responses once. If you also intend to check the Referring URL you must ensure that the source of the verification request is in the list of Allowed URLs.
Response Method: This determines how the transaction verification response will be handled.
Displayed as XML on our server: Once the transaction verification has been performed the HVARU will generate a page and display an XML string. This can be used in conjunction with URL, screen scraping or other such methods.
Displayed as key/value pairs on our server: Once the transaction verification has been performed the HVARU will generate a page and display key value pairs. This can be used in conjunction with URL, screen scraping or other such methods.
Note: When handling the response, you must be able to dynamically parse the data. In the future, new variables may be added and the order of the response variables may change.
Note: Click on the Save Verification Settings button to apply these chosen additional security features to the Hosted Vault configuration. If the security feature is not saved these fields will be returned to their last known saved configuration.
Vault Update Settings:This section will allow you to have the update information page locked for a specified number of minutes after a set number of sequential failed key attempts have been made. An email can also be sent when the page is locked.
Number of attempts:This is the number of sequential failed attempts that the HVARU will allow before locking and preventing all future attempts for the number of minutes defined under Lock Period. For example, to lock the update functionality for 15 minutes after it has received 4 invalid data keys sequentially, please set the Number of Attempts to 4 and the Lock Period to 15.
Lock Period:This defines the number of minutes the update functionality will be locked. To lock the update functionality indefinitely set Lock Period to '999'.
Email Address: If the HVARU is locked, a notification email will be sent to this address if it is filled in. To receive an email after every invalid data key but to never lock the update feature, configure Number of Attempts to '1' and Lock Period to '0', and fill in Email Address.
Note: Click on the Save Vault Update Settings button to apply these chosen additional security features to the Hosted Vault configuration. If the security feature is not saved these fields will be returned to their last known saved configuration. Next, click on the Return to main configuration button to continue with your Hosted Vault.
Configuration
After you have uploaded the files, you need to login to your Magento administration panel and refresh your cache by going to System > Cache management. Select Select All and click Refresh, so the cache gets updated. Then, go to your System > Configuration page and select Payment Methods. Verify that you have a new option called Moneris Credit Cards in the Payment Methods page. If you can see it there, Moneris Credit Cards has been installed correctly. The module has optional Postal Code AVS validation.The AVS is postal code match only. you will have to select the options you would like to decline cards for. if you enable this and the postal code is not a match; it will still allow the transaction however it will notify you that it did not match. You will need to look through the Moneris PDF and decide which AVS codes you would like to decline for. You will need the developers handbook and a good understanding of how Moneris processes AVS to configure this option and use it for fraud protection. You can also customize failed / decline messages in the admin section. If you turn on (*Magento) system logging in the developer configuration and enable the test mode for the module it will print all the details for debugging purpose. Test mode also enables the development servers as Moneris uses different servers for production and development.
- Reviews
-
- Installation
-
Before installing / updating or anything else
You should always backup your Magento Database & Magento Installation files. For more instructions on how to backup your installation please refer to these instructions. Please read all instructions before you start so you understand all the caveats of installing this module.
To Upgrade
If you have a previous version of this module installed you will just need to follow the installation instructions and replace all the files.
Unzipping and Uploading
After you have downloaded the Moneris Credit Card module for your store, please use a tool like Winrar, WinZip or similar to unzip the contents of the ZIP file you downloaded. Now check the extracted files, you should an "app" and "lib" folder. Then you are ready to upload your files. Open your favorite FTP/SFTP/SCP client and connect to the server with your Magento installation. Navigate to the root folder of the Magento installation, in other words the folder that contains folders like "app", "skin", "js", "lib" and more. Then, upload the extracted folders directly into the root of your Magento installation. Your FTP client will not overwrite any files, it will only upload the new files that come with the software.
Setup a Moneris Dev Account
Moneris Hosted Vault config / Installation
https://esqa.moneris.com/mpg/index.php
Creating a Hosted Vault Configuration
Once you have successfully logged in, click on Vault in the menu bar and then in the submenu that appears. Click on Hosted Vault Config. In the production environment, an individual must be granted permission to access and alter the configuration. User permissions may be updated by navigating to Admin and then selecting Modify User from the submenu. Once you have found the user to be updated, click on Set Permissions and update their Administrative Permissions. Each eSELECTplus account may have up to five unique Hosted Vault configurations. Each configuration can have a differing appearance as well as handle responses in varying ways. Because the eSELECTplus test environment is a shared environment there is no limit to the number of configurations assigned to a specific store account. However there is a 30 day time limit where a store configuration will be deleted after 30 days, regardless of use. Please do not alter or delete configurations that were not assigned to you. To create a new Hosted Vault configuration click on Generate a New Configuration. You will be assigned a Hosted Vault ID (res_id) this is the identifier for this unique configuration. You will also be assigned a Hosted Vault Token (res_key). The Hosted Vault ID and Token are sent as part of the registration/update request to securely identify your store and the specific configuration.
Configuring the Hosted Vault Page
Generate new res_key: This allows you to change the Hosted Vault Token (res_key). Both the res_id and res_key are to be kept secure, though if security were to be compromised, you may generate a new res_key without having to create a completely new configuration.
Basic Configuration
Response Method: This determines how the transaction response will be handled.
Sent to your server as a POST: eSELECTplus will use an HTTP POST to send the transaction responsesto your web server so that you can store the data_key and proceed with other processes which may be associated with account creation or updates.
Sent to your server as a GET: eSELECTplus will redirect the cardholder to a URL on your server and attach the response as a URL encoded query string at the end of the URL so that you can store the data_key and proceed with other processes which may be associated with account creation or updates. Please note that there are limitations imposed by the browser and operating system on the length of a query string.
Note: When handling the response (POST or GET), you must be able to dynamically parse the data. In the future, new variables may be added and the order of the response variables may change.
Response URL: You will need to specify the URL where the transaction response will be returned (either in a POST or GET). The URL needs to be complete www.example.com is not sufficient a proper URL is http://www.example.com/response.php (IP addresses are not supported). If a URL is missing or improperly typed it may result in a 404 error or a looping page.
Note: Click on the Save Changes button to save the existing configuration. If the configuration is not saved the current Hosted Vault ID (res_id) and Token (res_key) will be deleted after a period of time.
Hosted Vault Page Appearance
Click on the Configure Appearance button to specify what will be displayed on the Hosted Paypage. Hex Color Chart: All colors in the Colors and Styles section must be inputted as the standard HTML hex color value. You may click this button to view a color chart.
Colors and Styles
Background color: This defines the background color of the page.
Font style: This defines what font group will be used for the HVARU. We have defined three groups Arial/Helvetica/SansSerif, Times New Roman/Times/Serif and Courier New/Courier/Mono.
Primary text color: This defines the color of text on the HVARU. This must be legible on the chosen background color.
Merchant name color: This defines the color that will be used for your company's business/merchant name.
Header & footer highlight color: The HVARU will contain a header and footer and a color bar is used to define these sections. This defines the color of the header and footer bars.
Section divider color: The HVARU may be divided into several sections depending on what is displayed. A color bar is used to define the information. This defines the color of the section divider bars.
Section divider text color: Occasionally the Section Divider Bar will contain text this defines the color of the text that will appear in the Section Divider Bar. Please ensure that the text is legible (i.e. Do not pick the same color for the Section Divider Color and for the Section Divider Text Color).
Subsection divider color: The HVARU may be divided into several sub-sections depending on what is displayed. A color heading highlight is used to define the information. This defines the color of the sub-section headings.
Subsection divider text color: Occasionally the sub-section headings will contain text this defines the color of the text that will appear in the Subsection Divider. Please ensure that the text is legible (i.e. Do not pick the same color for the Subsection Divider Color and for the Subsection Divider Text Color).
Hosted Vault Page Data Fields
Display customer details. (cust_id, email, note, phone . . .): This field indicates whether the Customer ID (cust_id) is to be displayed on the HVARU the Customer ID field is often used for membership #s, policy #s, student IDs, or invoice #s. It is a searchable field from the Merchant Resource Centre. Also, this field will indicate whether the HVARU should display other fields such as the customers email address (email), the phone number (phone) and the note field the note field can contain any special instructions. In order to display this information it is required that the cust_id, email, phone and note fields be sent in the transaction request. Please see request variables to properly send this data. Display merchant name: This field indicates whether the Merchant Name should also be displayed on the HVARU. The name that will be displayed is the official Merchant Name that Moneris Solutions has associated with the account and the name that the cardholder will see on their credit card statement. It is mandated by industry regulations that the merchant name be displayed on any checkout pages and receipts, but this field may be omitted if the HVARU will be loaded within a frame that already displays the merchant name. If you choose to load the HVARU within a frame, you are then required to have an SSL certificate.
Hosted Vault Page Input Fields
Display AVS input: This defines whether the HVARU should include the prompt for the Address Verification Service (AVS) details. If these input fields are displayed on the Hosted Paypage it is then mandatory that the cardholder complete this data.
Logos:
This section defines what logos will appear on the hosted vault page. Please note that credit card logos are for display only and will not affect what card types you are able to accept. To begin accepting a new card type, please contact the Service Centre at 1-866-319-7450.
Credit Card Logos:Allows you to select which logos should appear on the hosted vault page. Check off theappropriate logos; Visa, MasterCard, American Express, Diners, Discover, Sears.
Note: Click on the Save Appearance Settings button to apply these appearance settings to the Hosted Vault configuration. If the appearance configuration is not saved these fields will be returned to their last known saved configuration.Next, click on the Return to main configuration button to continue with your Hosted Vault configuration setup.
Security Features
Click on Configure Security to add extra security measures to the HVARU.
Referring URL: By adding a URL, you specify that you would like us to check whether the transaction is coming from a location (URL) that you allow. Only POSTs sent from one of the specified URLs will be processed. (It is possible for the Referring URL to be spoofed this is not a guaranteed method of securing your transactions but it makes it more difficult).
Add URL: Here you can specify up to ten Referring URLs to a max of 255 characters. Each URL needs to be complete and at a registered domain www.example.com is not sufficient the proper URL is http://www.example.com/index.html (IP addresses are not supported). After specifying a URL, click on the Add URL button to add it to the Allowed URLs list. Once a URL has been added, the Remove URL button will become available.
Note: To verify your Referring URL, you may POST to https://esqa.moneris.com/HPPDP/myurl.php which will display the URL you are posting from.
Transaction Verification
Enable Transaction Verification: This must be checked for transaction verification to be enabled. When Transaction Verification is enabled the HVARU will return a transactionKey in the transaction response. When the response is received the fields should be logged and a transaction verification request is sent to eSELECTplus. eSELECTplus then replies with transaction information and whether the transaction was valid or not. Each transaction can only be verified once and it must be verified within 15 minutes of the original transaction being performed. This allows you to ensure that the responses sent to your page are not spoofed and that you are only receiving the responses once. If you also intend to check the Referring URL you must ensure that the source of the verification request is in the list of Allowed URLs.
Response Method: This determines how the transaction verification response will be handled.
Displayed as XML on our server: Once the transaction verification has been performed the HVARU will generate a page and display an XML string. This can be used in conjunction with URL, screen scraping or other such methods.
Displayed as key/value pairs on our server: Once the transaction verification has been performed the HVARU will generate a page and display key value pairs. This can be used in conjunction with URL, screen scraping or other such methods.
Note: When handling the response, you must be able to dynamically parse the data. In the future, new variables may be added and the order of the response variables may change.
Note: Click on the Save Verification Settings button to apply these chosen additional security features to the Hosted Vault configuration. If the security feature is not saved these fields will be returned to their last known saved configuration.
Vault Update Settings:This section will allow you to have the update information page locked for a specified number of minutes after a set number of sequential failed key attempts have been made. An email can also be sent when the page is locked.
Number of attempts:This is the number of sequential failed attempts that the HVARU will allow before locking and preventing all future attempts for the number of minutes defined under Lock Period. For example, to lock the update functionality for 15 minutes after it has received 4 invalid data keys sequentially, please set the Number of Attempts to 4 and the Lock Period to 15.
Lock Period:This defines the number of minutes the update functionality will be locked. To lock the update functionality indefinitely set Lock Period to '999'.
Email Address: If the HVARU is locked, a notification email will be sent to this address if it is filled in. To receive an email after every invalid data key but to never lock the update feature, configure Number of Attempts to '1' and Lock Period to '0', and fill in Email Address.
Note: Click on the Save Vault Update Settings button to apply these chosen additional security features to the Hosted Vault configuration. If the security feature is not saved these fields will be returned to their last known saved configuration. Next, click on the Return to main configuration button to continue with your Hosted Vault.
Configuration
After you have uploaded the files, you need to login to your Magento administration panel and refresh your cache by going to System > Cache management. Select Select All and click Refresh, so the cache gets updated. Then, go to your System > Configuration page and select Payment Methods. Verify that you have a new option called Moneris Credit Cards in the Payment Methods page. If you can see it there, Moneris Credit Cards has been installed correctly. The module has optional Postal Code AVS validation.The AVS is postal code match only. you will have to select the options you would like to decline cards for. if you enable this and the postal code is not a match; it will still allow the transaction however it will notify you that it did not match. You will need to look through the Moneris PDF and decide which AVS codes you would like to decline for. You will need the developers handbook and a good understanding of how Moneris processes AVS to configure this option and use it for fraud protection. You can also customize failed / decline messages in the admin section. If you turn on (*Magento) system logging in the developer configuration and enable the test mode for the module it will print all the details for debugging purpose. Test mode also enables the development servers as Moneris uses different servers for production and development.