

Our Modules.
Magento Moneris INTERAC Online Payment Module CA (On Site Processing)
")

More Views


- Description
-
Details
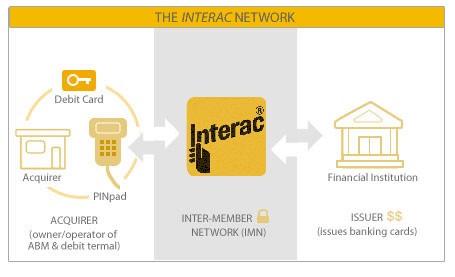
This module supports On-Site processing of interac through the Moneris gateway. Interac only supports the following banks in Canada: TD Canada Trust, RBC, BMO, and Scotia Bank. The module supports refunds and Capture only.
We offer both a Community Edition and Enterprise Edition for this module. This extension has been tried and tested on the latest Magento version.
Please note:
There is a 39 point certification process that is required by Moneris before your site can process live Interac payments. The process is somewhat lengthy so for this module the installation fee is much larger than normal but it includes completing the certification process on your behalf. You can of course perform the steps yourself, but you can expect it to take about a day to complete.Support
Need Help? Please contact us using the contact form. Paid installation is available.
Not sure which module you need?
Try our Moneris module decision manager.
- Additional Information
-
Additional Information
- License
- Commercial
- System
- Magento Module
- System Version
- 1.7.0.x
- Warranty
- 6 Months
- Module Type
- Payment Module
- Installation Instructions
Before installing / updating or anything else
You should always backup your Magento Database & Magento Installation files. For more instructions on how to backup your installation please refer to these instructions. Please read all instructions before you start so you understand all the caveats of installing this module.
To Upgrade
If you have a previous version of this module installed you will just need to follow the installation instructions and replace all the files.
Unzipping and Uploading
After you have downloaded the Moneris Interac Online Payment Module for your store, please use a tool like Winrar, 7zip or similar to unzip the contents of the ZIP file you downloaded. Now check the extracted files, you should an "app" and "lib" folder. The module has the file "_CHshow_urls.php", If you open this file on the target site it will give you the information you need for setting up with Moneris. Then you are ready to upload your files. Open your favorite FTP/SFTP/SCP client and connect to the server with your Magento installation. Navigate to the root folder of the Magento installation, in other words the folder that contains folders like "app", "skin", "js", "lib" and more. Then, upload the extracted folders directly into the root of your Magento installation. Your FTP client will not overwrite any files, it will only upload the new files that come with the software.
Configuration
<>After you have uploaded the files, you need to login to your Magento administration panel and refresh your cache by going to System > Cache management. Select "Select All" and click "Refresh", so the cache gets updated. Then, go to your System > Configuration page and select Payment Methods. Verify that you have a new option called Moneris Interac in the Payment Methods page. If you can see it there, Moneris Interac Online Payment has been installed correctly.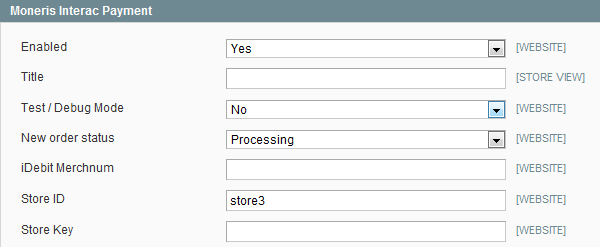
For setting up the Interac URLS please add the following after your domain name: _CHshow_urls.php This will display the URL's you are to use with configuration.
It is very important that the success page displays the receipt information. It is possible that if you have a custom theme, receipt information is not displayed, however you must ensure that this does not occur and all information is shown.
Testing
Online transactions, you will be forwarded to the INTERAC Online Merchant Testing Tool. A screen will appear where certain fields need to be completed.

For an approved response you will need to enter the following data in to the fields, do not alter any of the other fields.
IDEBIT_TRACK2: To form a track2 when testing with the Moneris Gateway please use one of these three numbers:
3728024906540591206=01121122334455000
5268051119993326=01121122334455000000
453781122255=011211223344550000000000
IDEBIT_ISSNAME: RBC
IDEBIT_ISSCONF: 123456
For a declined response, provide any value as the IDEBIT_TRACK2. Click “Post to Merchant”. Do not click “Validate Data” – it will return validation errors.
To configure for production change the endpoint url to https://gateway.interaconline.com/merchant_processor.do
Add Logo to Footer
As a requirement from Moneris, you must have the logo displayed in the footer of your site. You can add the image to a footer_links static block. This is the simplest method for getting the logo on the footer, without having to change template files.
Open the footer_links static block from CMS > Static Blocks. Add the following code to the static block.
"<p><img title="INTERAC Online" src="https://www.collinsharper.com/images/715368840_51556.gif" alt="INTERAC Online" width="80" border="0" /></p> <ul> <ul>INTERAC ® Online.</ul> </ul> <p><sub>® Trade-mark of Interac Inc. Used under licence <a href="http://www.interaconline.com/learn/" target="_blank">Learn More</a></sub></p>"
Ensure to save the static block and now the logo is being displayed in your footer!
- Reviews
-
- Installation
-
Before installing / updating or anything else
You should always backup your Magento Database & Magento Installation files. For more instructions on how to backup your installation please refer to these instructions. Please read all instructions before you start so you understand all the caveats of installing this module.
To Upgrade
If you have a previous version of this module installed you will just need to follow the installation instructions and replace all the files.
Unzipping and Uploading
After you have downloaded the Moneris Interac Online Payment Module for your store, please use a tool like Winrar, 7zip or similar to unzip the contents of the ZIP file you downloaded. Now check the extracted files, you should an "app" and "lib" folder. The module has the file "_CHshow_urls.php", If you open this file on the target site it will give you the information you need for setting up with Moneris. Then you are ready to upload your files. Open your favorite FTP/SFTP/SCP client and connect to the server with your Magento installation. Navigate to the root folder of the Magento installation, in other words the folder that contains folders like "app", "skin", "js", "lib" and more. Then, upload the extracted folders directly into the root of your Magento installation. Your FTP client will not overwrite any files, it will only upload the new files that come with the software.
Configuration
<>After you have uploaded the files, you need to login to your Magento administration panel and refresh your cache by going to System > Cache management. Select "Select All" and click "Refresh", so the cache gets updated. Then, go to your System > Configuration page and select Payment Methods. Verify that you have a new option called Moneris Interac in the Payment Methods page. If you can see it there, Moneris Interac Online Payment has been installed correctly.
For setting up the Interac URLS please add the following after your domain name: _CHshow_urls.php This will display the URL's you are to use with configuration.
It is very important that the success page displays the receipt information. It is possible that if you have a custom theme, receipt information is not displayed, however you must ensure that this does not occur and all information is shown.
Testing
Online transactions, you will be forwarded to the INTERAC Online Merchant Testing Tool. A screen will appear where certain fields need to be completed.
For an approved response you will need to enter the following data in to the fields, do not alter any of the other fields.
IDEBIT_TRACK2: To form a track2 when testing with the Moneris Gateway please use one of these three numbers:
3728024906540591206=01121122334455000
5268051119993326=01121122334455000000
453781122255=011211223344550000000000
IDEBIT_ISSNAME: RBC
IDEBIT_ISSCONF: 123456
For a declined response, provide any value as the IDEBIT_TRACK2. Click “Post to Merchant”. Do not click “Validate Data” – it will return validation errors.
To configure for production change the endpoint url to https://gateway.interaconline.com/merchant_processor.do
Add Logo to Footer
As a requirement from Moneris, you must have the logo displayed in the footer of your site. You can add the image to a footer_links static block. This is the simplest method for getting the logo on the footer, without having to change template files.
Open the footer_links static block from CMS > Static Blocks. Add the following code to the static block.
"<p><img title="INTERAC Online" src="https://www.collinsharper.com/images/715368840_51556.gif" alt="INTERAC Online" width="80" border="0" /></p> <ul> <ul>INTERAC ® Online.</ul> </ul> <p><sub>® Trade-mark of Interac Inc. Used under licence <a href="http://www.interaconline.com/learn/" target="_blank">Learn More</a></sub></p>"
Ensure to save the static block and now the logo is being displayed in your footer!
Magento Moneris INTERAC Online Payment Module CA (On Site Processing)
More Views
- Description
-
Details
This module supports On-Site processing of interac through the Moneris gateway. Interac only supports the following banks in Canada: TD Canada Trust, RBC, BMO, and Scotia Bank. The module supports refunds and Capture only.
We offer both a Community Edition and Enterprise Edition for this module. This extension has been tried and tested on the latest Magento version.
Please note:
There is a 39 point certification process that is required by Moneris before your site can process live Interac payments. The process is somewhat lengthy so for this module the installation fee is much larger than normal but it includes completing the certification process on your behalf. You can of course perform the steps yourself, but you can expect it to take about a day to complete.Support
Need Help? Please contact us using the contact form. Paid installation is available.
Not sure which module you need?
Try our Moneris module decision manager.
- Additional Information
-
Additional Information
- License
- Commercial
- System
- Magento Module
- System Version
- 1.7.0.x
- Warranty
- 6 Months
- Module Type
- Payment Module
- Installation Instructions
Before installing / updating or anything else
You should always backup your Magento Database & Magento Installation files. For more instructions on how to backup your installation please refer to these instructions. Please read all instructions before you start so you understand all the caveats of installing this module.
To Upgrade
If you have a previous version of this module installed you will just need to follow the installation instructions and replace all the files.
Unzipping and Uploading
After you have downloaded the Moneris Interac Online Payment Module for your store, please use a tool like Winrar, 7zip or similar to unzip the contents of the ZIP file you downloaded. Now check the extracted files, you should an "app" and "lib" folder. The module has the file "_CHshow_urls.php", If you open this file on the target site it will give you the information you need for setting up with Moneris. Then you are ready to upload your files. Open your favorite FTP/SFTP/SCP client and connect to the server with your Magento installation. Navigate to the root folder of the Magento installation, in other words the folder that contains folders like "app", "skin", "js", "lib" and more. Then, upload the extracted folders directly into the root of your Magento installation. Your FTP client will not overwrite any files, it will only upload the new files that come with the software.
Configuration
<>After you have uploaded the files, you need to login to your Magento administration panel and refresh your cache by going to System > Cache management. Select "Select All" and click "Refresh", so the cache gets updated. Then, go to your System > Configuration page and select Payment Methods. Verify that you have a new option called Moneris Interac in the Payment Methods page. If you can see it there, Moneris Interac Online Payment has been installed correctly.
For setting up the Interac URLS please add the following after your domain name: _CHshow_urls.php This will display the URL's you are to use with configuration.
It is very important that the success page displays the receipt information. It is possible that if you have a custom theme, receipt information is not displayed, however you must ensure that this does not occur and all information is shown.
Testing
Online transactions, you will be forwarded to the INTERAC Online Merchant Testing Tool. A screen will appear where certain fields need to be completed.
For an approved response you will need to enter the following data in to the fields, do not alter any of the other fields.
IDEBIT_TRACK2: To form a track2 when testing with the Moneris Gateway please use one of these three numbers:
3728024906540591206=01121122334455000
5268051119993326=01121122334455000000
453781122255=011211223344550000000000
IDEBIT_ISSNAME: RBC
IDEBIT_ISSCONF: 123456
For a declined response, provide any value as the IDEBIT_TRACK2. Click “Post to Merchant”. Do not click “Validate Data” – it will return validation errors.
To configure for production change the endpoint url to https://gateway.interaconline.com/merchant_processor.do
Add Logo to Footer
As a requirement from Moneris, you must have the logo displayed in the footer of your site. You can add the image to a footer_links static block. This is the simplest method for getting the logo on the footer, without having to change template files.
Open the footer_links static block from CMS > Static Blocks. Add the following code to the static block.
"<p><img title="INTERAC Online" src="https://www.collinsharper.com/images/715368840_51556.gif" alt="INTERAC Online" width="80" border="0" /></p> <ul> <ul>INTERAC ® Online.</ul> </ul> <p><sub>® Trade-mark of Interac Inc. Used under licence <a href="http://www.interaconline.com/learn/" target="_blank">Learn More</a></sub></p>"
Ensure to save the static block and now the logo is being displayed in your footer!
- Reviews
-
- Installation
-
Before installing / updating or anything else
You should always backup your Magento Database & Magento Installation files. For more instructions on how to backup your installation please refer to these instructions. Please read all instructions before you start so you understand all the caveats of installing this module.
To Upgrade
If you have a previous version of this module installed you will just need to follow the installation instructions and replace all the files.
Unzipping and Uploading
After you have downloaded the Moneris Interac Online Payment Module for your store, please use a tool like Winrar, 7zip or similar to unzip the contents of the ZIP file you downloaded. Now check the extracted files, you should an "app" and "lib" folder. The module has the file "_CHshow_urls.php", If you open this file on the target site it will give you the information you need for setting up with Moneris. Then you are ready to upload your files. Open your favorite FTP/SFTP/SCP client and connect to the server with your Magento installation. Navigate to the root folder of the Magento installation, in other words the folder that contains folders like "app", "skin", "js", "lib" and more. Then, upload the extracted folders directly into the root of your Magento installation. Your FTP client will not overwrite any files, it will only upload the new files that come with the software.
Configuration
<>After you have uploaded the files, you need to login to your Magento administration panel and refresh your cache by going to System > Cache management. Select "Select All" and click "Refresh", so the cache gets updated. Then, go to your System > Configuration page and select Payment Methods. Verify that you have a new option called Moneris Interac in the Payment Methods page. If you can see it there, Moneris Interac Online Payment has been installed correctly.
For setting up the Interac URLS please add the following after your domain name: _CHshow_urls.php This will display the URL's you are to use with configuration.
It is very important that the success page displays the receipt information. It is possible that if you have a custom theme, receipt information is not displayed, however you must ensure that this does not occur and all information is shown.
Testing
Online transactions, you will be forwarded to the INTERAC Online Merchant Testing Tool. A screen will appear where certain fields need to be completed.
For an approved response you will need to enter the following data in to the fields, do not alter any of the other fields.
IDEBIT_TRACK2: To form a track2 when testing with the Moneris Gateway please use one of these three numbers:
3728024906540591206=01121122334455000
5268051119993326=01121122334455000000
453781122255=011211223344550000000000
IDEBIT_ISSNAME: RBC
IDEBIT_ISSCONF: 123456
For a declined response, provide any value as the IDEBIT_TRACK2. Click “Post to Merchant”. Do not click “Validate Data” – it will return validation errors.
To configure for production change the endpoint url to https://gateway.interaconline.com/merchant_processor.do
Add Logo to Footer
As a requirement from Moneris, you must have the logo displayed in the footer of your site. You can add the image to a footer_links static block. This is the simplest method for getting the logo on the footer, without having to change template files.
Open the footer_links static block from CMS > Static Blocks. Add the following code to the static block.
"<p><img title="INTERAC Online" src="https://www.collinsharper.com/images/715368840_51556.gif" alt="INTERAC Online" width="80" border="0" /></p> <ul> <ul>INTERAC ® Online.</ul> </ul> <p><sub>® Trade-mark of Interac Inc. Used under licence <a href="http://www.interaconline.com/learn/" target="_blank">Learn More</a></sub></p>"
Ensure to save the static block and now the logo is being displayed in your footer!