

Our Modules.
Magento Canada Post Business Desktop (EST) Electronic Shipping Tools Integration Module
 Electronic Shipping Tools Integration Module")
More Views


- Description
-
Details
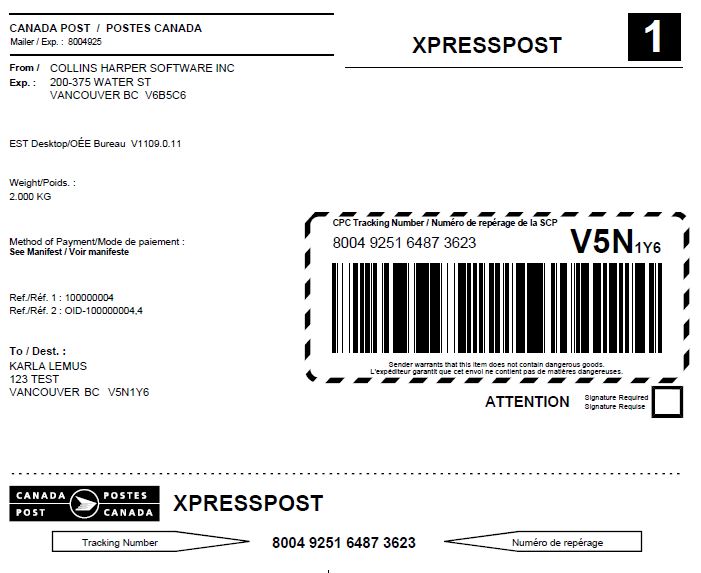
This module will export your shipments to Canada Post EST Electronic Shipping Tools Desktop 2.0 for businesses (formerly Canada Post VCD Desktop software)
It supports Canadian orders and Foreign orders. This module will export only Canada post shipments or you can export all shipments selected and have it convert them to Canada post. It will import all data necessary for the customs documents for USA bound shipments.
It also adds facilities for importing the tracking information and associating the tracking numbers back to shipments. Ensure to purchase the Canada Post Professional Rate Module for one click customer order tracking inside Magento and to use the dimensions specified from Canada Post for auto shipment creation .Highlights
 Handle your entire shipping and mailing process online from canadapost.ca.
Ship and mail worldwide using a variety of our services.
Compare rates and delivery times for different services.
Prepare an Unaddressed Admail™ campaign targeting multiple areas.
Send emails with tracking numbers to your customers.
Store and manage names in the address book.
Magento EE compatible.
Support
Need Help? Please contact us using the contact form. Paid installation is available.
How to get a Canada Post ID for your Canada Post Shipping Module.
- Additional Information
-
Additional Information
- License
- Commercial
- System
- Magento Module
- System Version
- 1.4.x
- Warranty
- 6 Months
- Module Type
- Shipping Module
- Installation Instructions
- This module will allow you to export shipments to Canada post Business Desktop software (*not the online version) from the shipments tab in the Magento admin.
You can export only shipments quoted for Canada Post shipping during checkout or export all shipments related to an order and substitute Canada Post shipment methods instead of what was quoted. As there are a number of options that are exported with each shipment to the desktop software. All extended options will be selected from the admin defaults unless a product in the shipment has them set in the product details.
Installation
1. You must have FTP access to your server.
2. Extract the archive to your local computer.
3. Open the Magento root folder, upload the app folder; it should not overwrite any files.
4. This module does overload some core files so it may have conflicts with other modules.
Finishing Installation
1. Log in to your Magento admin panel.
2. Click 'System' > 'Cache Management'.
3. 'Select All' and 'Refresh' all cache.
4. Log out and log back in.
5. Click 'System' > 'Configuration'.
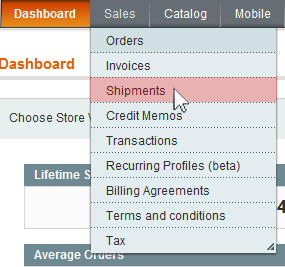
6. Scroll down, on the left side navigation in the 'Sales' group click 'Shipping Settings'.
7. Review the settings for Canada Post VCD Shipment Exporter.
8. Select ‘Save Config’ to save your settings.
Testing
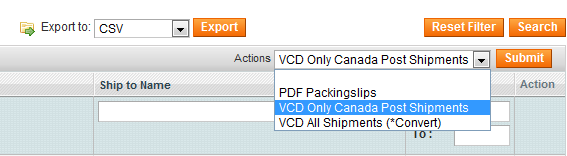
Under the Sales > Shipment, you now have a mass action to export only Canada Post shipments or to export all selected shipments and ship them all with Canada Post. You can either 'Select All' or only select the ones you want.
Please note if your orders need to be 'invoiced' first. This could be because they have sent a cheque, wire transfer or you've set your credit card payment to 'authorize'. After you invoice, these orders will appear under the 'shipment' tab. If the funds have been captured right away, the invoice was automatically created and is already under the 'shipment' tab.
If a shipment was not sent from Canada Post it will use the default selected to ship them and it will assign the fixed L W H values you set in the configuration section.
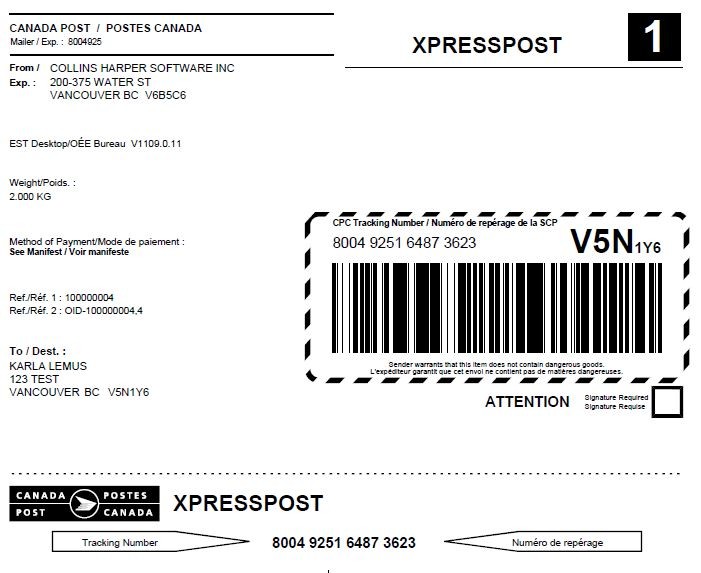
Once you select Submit, your browser will automatically download the txt file you need to upload to the desktop application.

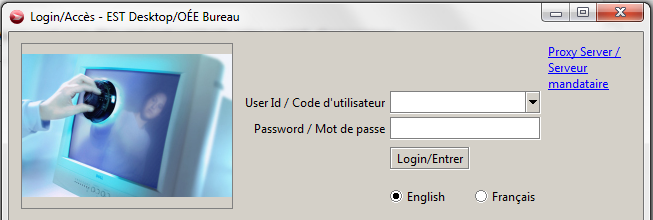
Login to your Canada Post EST Desktop.
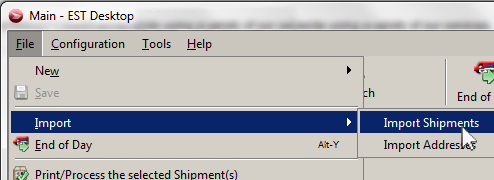
Select File > Import > Import Shipments
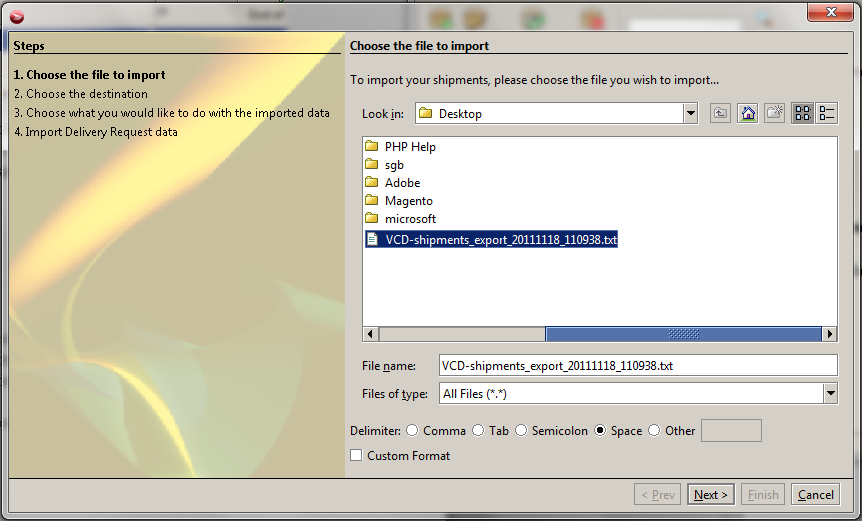
Locate the txt file you downloaded most likely name 'VCD-shipments_export...". Select 'Next >'
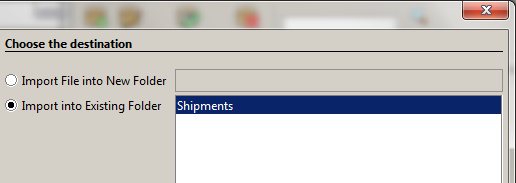
Select the folder you would like to upload your shipments to. We will use 'Shipments'. Select 'Next >'
Chose what you would like to do with the imported data. Save or Print.
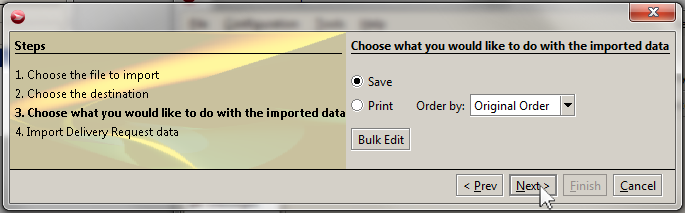
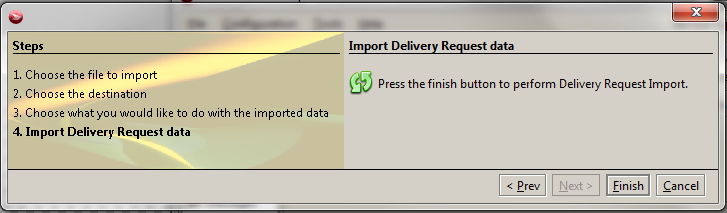
Select Finish to finish importing your shipments.
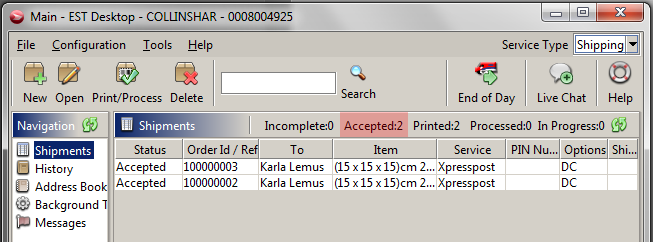
Once imported, your orders will appear under the 'accepted' tab.
Double click the order to view configuration. If the product attributes are configured properly, they will have their specific weight, length, width, and height. If not, it will use the default values you configured in the Admin panel under Shipping Settings.
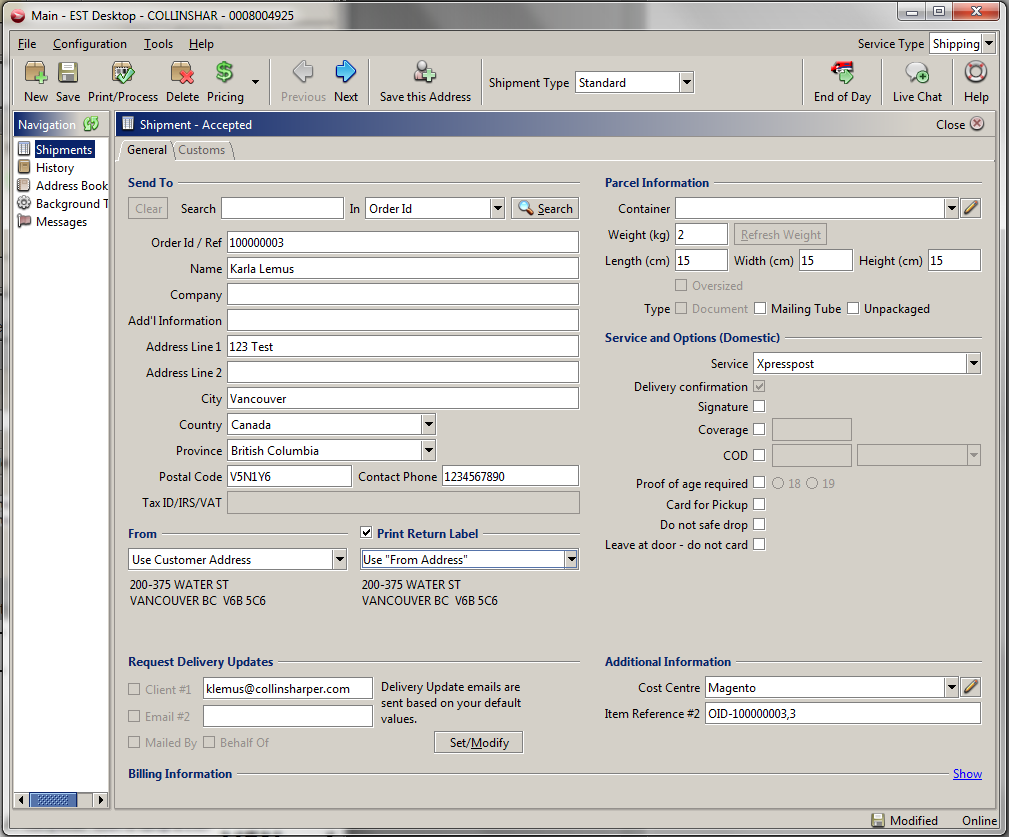
When you are ready select print/process to print your labels to ship the order.
*Requires Canada Post Pro shipping request module
From the Sales Order Mass action menu you now have two options to generate shipments based on the boxing that Canada Post specified during your rate request.
Issues
For each shipment in Canada Post you are only allowed 6 descriptive line items. So, if an order has 12 items it will only describe the first 6 (*this is for customs labels only in international shipments. It does not apply to domestic shipments).
You can add these attributes to products if you need specific harm code data per product:
▪ tarrif_code
▪ hs_code
▪ origin_country
▪ origin_province
Canada post has a Max Weight in grams for certain packages for certain province / city locations. This may cause problems and we have no further details in this issue.
Options for default shipping types:
▪ 'canpostmodule_XPressPost' => 908,
▪ 'canpostmodule_Regular' => 966,
▪ 'canpostmodule_Expedited' => 967,
▪ 'canpostmodule_Surface International' => 984,
▪ 'canpostmodule_Air International' => 985,
▪ 'canpostmodule_XPressPost Evening' => 1107,
▪ 'canpostmodule_Small Packets Air' => 1123,
▪ 'canpostmodule_Small Packets - Surface' => 1124,
▪ 'canpostmodule_Air US' => 1235,
▪ 'canpostmodule_Priority Courier' => 1469,
▪ 'canpostmodule_Small Packets Surface' => 9611,
▪ 'canpostmodule_Small Packets Air' => 9610,
▪ 'canpostmodule_Priority Courier' => 1829,
▪ 'canpostmodule_Expedited US Commercial' => 6470,
▪ 'canpostmodule_Xpresspost USA' => 1917
- Reviews
-
- Installation
-
This module will allow you to export shipments to Canada post Business Desktop software (*not the online version) from the shipments tab in the Magento admin.
You can export only shipments quoted for Canada Post shipping during checkout or export all shipments related to an order and substitute Canada Post shipment methods instead of what was quoted. As there are a number of options that are exported with each shipment to the desktop software. All extended options will be selected from the admin defaults unless a product in the shipment has them set in the product details.
Installation
1. You must have FTP access to your server.
2. Extract the archive to your local computer.
3. Open the Magento root folder, upload the app folder; it should not overwrite any files.
4. This module does overload some core files so it may have conflicts with other modules.
Finishing Installation
1. Log in to your Magento admin panel.
2. Click 'System' > 'Cache Management'.
3. 'Select All' and 'Refresh' all cache.
4. Log out and log back in.
5. Click 'System' > 'Configuration'.
6. Scroll down, on the left side navigation in the 'Sales' group click 'Shipping Settings'.
7. Review the settings for Canada Post VCD Shipment Exporter.
8. Select ‘Save Config’ to save your settings.
Testing
Under the Sales > Shipment, you now have a mass action to export only Canada Post shipments or to export all selected shipments and ship them all with Canada Post. You can either 'Select All' or only select the ones you want.
Please note if your orders need to be 'invoiced' first. This could be because they have sent a cheque, wire transfer or you've set your credit card payment to 'authorize'. After you invoice, these orders will appear under the 'shipment' tab. If the funds have been captured right away, the invoice was automatically created and is already under the 'shipment' tab.
If a shipment was not sent from Canada Post it will use the default selected to ship them and it will assign the fixed L W H values you set in the configuration section.
Once you select Submit, your browser will automatically download the txt file you need to upload to the desktop application.
Login to your Canada Post EST Desktop.
Select File > Import > Import Shipments
Locate the txt file you downloaded most likely name 'VCD-shipments_export...". Select 'Next >'
Select the folder you would like to upload your shipments to. We will use 'Shipments'. Select 'Next >'
Chose what you would like to do with the imported data. Save or Print.
Select Finish to finish importing your shipments.
Once imported, your orders will appear under the 'accepted' tab.
Double click the order to view configuration. If the product attributes are configured properly, they will have their specific weight, length, width, and height. If not, it will use the default values you configured in the Admin panel under Shipping Settings.
When you are ready select print/process to print your labels to ship the order.
*Requires Canada Post Pro shipping request module
From the Sales Order Mass action menu you now have two options to generate shipments based on the boxing that Canada Post specified during your rate request.
Issues
For each shipment in Canada Post you are only allowed 6 descriptive line items. So, if an order has 12 items it will only describe the first 6 (*this is for customs labels only in international shipments. It does not apply to domestic shipments).
You can add these attributes to products if you need specific harm code data per product:
▪ tarrif_code
▪ hs_code
▪ origin_country
▪ origin_province
Canada post has a Max Weight in grams for certain packages for certain province / city locations. This may cause problems and we have no further details in this issue.
Options for default shipping types:
▪ 'canpostmodule_XPressPost' => 908,
▪ 'canpostmodule_Regular' => 966,
▪ 'canpostmodule_Expedited' => 967,
▪ 'canpostmodule_Surface International' => 984,
▪ 'canpostmodule_Air International' => 985,
▪ 'canpostmodule_XPressPost Evening' => 1107,
▪ 'canpostmodule_Small Packets Air' => 1123,
▪ 'canpostmodule_Small Packets - Surface' => 1124,
▪ 'canpostmodule_Air US' => 1235,
▪ 'canpostmodule_Priority Courier' => 1469,
▪ 'canpostmodule_Small Packets Surface' => 9611,
▪ 'canpostmodule_Small Packets Air' => 9610,
▪ 'canpostmodule_Priority Courier' => 1829,
▪ 'canpostmodule_Expedited US Commercial' => 6470,
▪ 'canpostmodule_Xpresspost USA' => 1917
Magento Canada Post Business Desktop (EST) Electronic Shipping Tools Integration Module
More Views
- Description
-
Details
This module will export your shipments to Canada Post EST Electronic Shipping Tools Desktop 2.0 for businesses (formerly Canada Post VCD Desktop software)
It supports Canadian orders and Foreign orders. This module will export only Canada post shipments or you can export all shipments selected and have it convert them to Canada post. It will import all data necessary for the customs documents for USA bound shipments.
It also adds facilities for importing the tracking information and associating the tracking numbers back to shipments. Ensure to purchase the Canada Post Professional Rate Module for one click customer order tracking inside Magento and to use the dimensions specified from Canada Post for auto shipment creation .Highlights
Handle your entire shipping and mailing process online from canadapost.ca.
Ship and mail worldwide using a variety of our services.
Compare rates and delivery times for different services.
Prepare an Unaddressed Admail™ campaign targeting multiple areas.
Send emails with tracking numbers to your customers.
Store and manage names in the address book.
Magento EE compatible.
Support
Need Help? Please contact us using the contact form. Paid installation is available.
How to get a Canada Post ID for your Canada Post Shipping Module.
- Additional Information
-
Additional Information
- License
- Commercial
- System
- Magento Module
- System Version
- 1.4.x
- Warranty
- 6 Months
- Module Type
- Shipping Module
- Installation Instructions
- This module will allow you to export shipments to Canada post Business Desktop software (*not the online version) from the shipments tab in the Magento admin.
You can export only shipments quoted for Canada Post shipping during checkout or export all shipments related to an order and substitute Canada Post shipment methods instead of what was quoted. As there are a number of options that are exported with each shipment to the desktop software. All extended options will be selected from the admin defaults unless a product in the shipment has them set in the product details.
Installation
1. You must have FTP access to your server.
2. Extract the archive to your local computer.
3. Open the Magento root folder, upload the app folder; it should not overwrite any files.
4. This module does overload some core files so it may have conflicts with other modules.
Finishing Installation
1. Log in to your Magento admin panel.
2. Click 'System' > 'Cache Management'.
3. 'Select All' and 'Refresh' all cache.
4. Log out and log back in.
5. Click 'System' > 'Configuration'.
6. Scroll down, on the left side navigation in the 'Sales' group click 'Shipping Settings'.
7. Review the settings for Canada Post VCD Shipment Exporter.
8. Select ‘Save Config’ to save your settings.
Testing
Under the Sales > Shipment, you now have a mass action to export only Canada Post shipments or to export all selected shipments and ship them all with Canada Post. You can either 'Select All' or only select the ones you want.
Please note if your orders need to be 'invoiced' first. This could be because they have sent a cheque, wire transfer or you've set your credit card payment to 'authorize'. After you invoice, these orders will appear under the 'shipment' tab. If the funds have been captured right away, the invoice was automatically created and is already under the 'shipment' tab.
If a shipment was not sent from Canada Post it will use the default selected to ship them and it will assign the fixed L W H values you set in the configuration section.
Once you select Submit, your browser will automatically download the txt file you need to upload to the desktop application.
Login to your Canada Post EST Desktop.
Select File > Import > Import Shipments
Locate the txt file you downloaded most likely name 'VCD-shipments_export...". Select 'Next >'
Select the folder you would like to upload your shipments to. We will use 'Shipments'. Select 'Next >'
Chose what you would like to do with the imported data. Save or Print.
Select Finish to finish importing your shipments.
Once imported, your orders will appear under the 'accepted' tab.
Double click the order to view configuration. If the product attributes are configured properly, they will have their specific weight, length, width, and height. If not, it will use the default values you configured in the Admin panel under Shipping Settings.
When you are ready select print/process to print your labels to ship the order.
*Requires Canada Post Pro shipping request module
From the Sales Order Mass action menu you now have two options to generate shipments based on the boxing that Canada Post specified during your rate request.
Issues
For each shipment in Canada Post you are only allowed 6 descriptive line items. So, if an order has 12 items it will only describe the first 6 (*this is for customs labels only in international shipments. It does not apply to domestic shipments).
You can add these attributes to products if you need specific harm code data per product:
▪ tarrif_code
▪ hs_code
▪ origin_country
▪ origin_province
Canada post has a Max Weight in grams for certain packages for certain province / city locations. This may cause problems and we have no further details in this issue.
Options for default shipping types:
▪ 'canpostmodule_XPressPost' => 908,
▪ 'canpostmodule_Regular' => 966,
▪ 'canpostmodule_Expedited' => 967,
▪ 'canpostmodule_Surface International' => 984,
▪ 'canpostmodule_Air International' => 985,
▪ 'canpostmodule_XPressPost Evening' => 1107,
▪ 'canpostmodule_Small Packets Air' => 1123,
▪ 'canpostmodule_Small Packets - Surface' => 1124,
▪ 'canpostmodule_Air US' => 1235,
▪ 'canpostmodule_Priority Courier' => 1469,
▪ 'canpostmodule_Small Packets Surface' => 9611,
▪ 'canpostmodule_Small Packets Air' => 9610,
▪ 'canpostmodule_Priority Courier' => 1829,
▪ 'canpostmodule_Expedited US Commercial' => 6470,
▪ 'canpostmodule_Xpresspost USA' => 1917
- Reviews
-
- Installation
-
This module will allow you to export shipments to Canada post Business Desktop software (*not the online version) from the shipments tab in the Magento admin.
You can export only shipments quoted for Canada Post shipping during checkout or export all shipments related to an order and substitute Canada Post shipment methods instead of what was quoted. As there are a number of options that are exported with each shipment to the desktop software. All extended options will be selected from the admin defaults unless a product in the shipment has them set in the product details.
Installation
1. You must have FTP access to your server.
2. Extract the archive to your local computer.
3. Open the Magento root folder, upload the app folder; it should not overwrite any files.
4. This module does overload some core files so it may have conflicts with other modules.
Finishing Installation
1. Log in to your Magento admin panel.
2. Click 'System' > 'Cache Management'.
3. 'Select All' and 'Refresh' all cache.
4. Log out and log back in.
5. Click 'System' > 'Configuration'.
6. Scroll down, on the left side navigation in the 'Sales' group click 'Shipping Settings'.
7. Review the settings for Canada Post VCD Shipment Exporter.
8. Select ‘Save Config’ to save your settings.
Testing
Under the Sales > Shipment, you now have a mass action to export only Canada Post shipments or to export all selected shipments and ship them all with Canada Post. You can either 'Select All' or only select the ones you want.
Please note if your orders need to be 'invoiced' first. This could be because they have sent a cheque, wire transfer or you've set your credit card payment to 'authorize'. After you invoice, these orders will appear under the 'shipment' tab. If the funds have been captured right away, the invoice was automatically created and is already under the 'shipment' tab.
If a shipment was not sent from Canada Post it will use the default selected to ship them and it will assign the fixed L W H values you set in the configuration section.
Once you select Submit, your browser will automatically download the txt file you need to upload to the desktop application.
Login to your Canada Post EST Desktop.
Select File > Import > Import Shipments
Locate the txt file you downloaded most likely name 'VCD-shipments_export...". Select 'Next >'
Select the folder you would like to upload your shipments to. We will use 'Shipments'. Select 'Next >'
Chose what you would like to do with the imported data. Save or Print.
Select Finish to finish importing your shipments.
Once imported, your orders will appear under the 'accepted' tab.
Double click the order to view configuration. If the product attributes are configured properly, they will have their specific weight, length, width, and height. If not, it will use the default values you configured in the Admin panel under Shipping Settings.
When you are ready select print/process to print your labels to ship the order.
*Requires Canada Post Pro shipping request module
From the Sales Order Mass action menu you now have two options to generate shipments based on the boxing that Canada Post specified during your rate request.
Issues
For each shipment in Canada Post you are only allowed 6 descriptive line items. So, if an order has 12 items it will only describe the first 6 (*this is for customs labels only in international shipments. It does not apply to domestic shipments).
You can add these attributes to products if you need specific harm code data per product:
▪ tarrif_code
▪ hs_code
▪ origin_country
▪ origin_province
Canada post has a Max Weight in grams for certain packages for certain province / city locations. This may cause problems and we have no further details in this issue.
Options for default shipping types:
▪ 'canpostmodule_XPressPost' => 908,
▪ 'canpostmodule_Regular' => 966,
▪ 'canpostmodule_Expedited' => 967,
▪ 'canpostmodule_Surface International' => 984,
▪ 'canpostmodule_Air International' => 985,
▪ 'canpostmodule_XPressPost Evening' => 1107,
▪ 'canpostmodule_Small Packets Air' => 1123,
▪ 'canpostmodule_Small Packets - Surface' => 1124,
▪ 'canpostmodule_Air US' => 1235,
▪ 'canpostmodule_Priority Courier' => 1469,
▪ 'canpostmodule_Small Packets Surface' => 9611,
▪ 'canpostmodule_Small Packets Air' => 9610,
▪ 'canpostmodule_Priority Courier' => 1829,
▪ 'canpostmodule_Expedited US Commercial' => 6470,
▪ 'canpostmodule_Xpresspost USA' => 1917